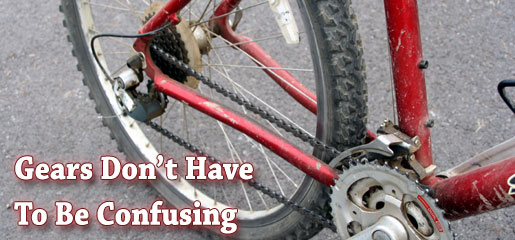
Moving from a one speed bicycle to one with multiple gears is a big step. Not only do you have to learn how to shift the gears, you also have to learn what gears to use, and figure out when to shift into which gear!
I was reminding of this when I received this plea for help…
I have a 28 speed and knowing when to shift, and what gear to shift to is driving me nuts! I need an idiots’ guide to shifting! Help!!!
Well, you got it! Here is the “Complete Idiot’s Guide to Bicycle Gears & Shifting” to explain everything a beginner needs to know about using a multi-speed bicycle.
Table of Contents
Introduction to Gears and Terminology
Ever since bicycles came with more than one sprocket on the front and back, they were usually referred to as the number of gear combinations that were offered. For example, a road bike with two chainrings up front and a five-speed freewheel on the back was a “10 speed,” since the five rear sprockets could be matched with either of the two front chainrings. (2×5=10, it’s just simple math.)
But once you learn more about gearing, you’ll see that that is actually a confusing way to describe things. So to start things off, let’s get the terminology straightened out:
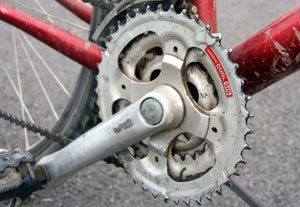
The front sprockets that are attached to the crankarm are called chainrings. If you have two chainrings (a big ring and a little ring,) that setup is called a “double.” If you have three chainrings (big, middle, and little,) you have a “triple” chainring setup.
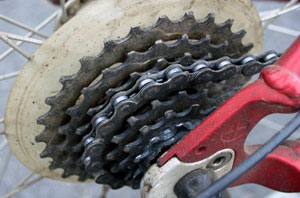
The gear cluster on the rear wheel is either a freewheel or a cassette. If your bike has five gears on the back, it probably has a freewheel. If your bike has eight to ten gears on the back, it has a cassette. Each ring on the cassette is referred to as a cog. (The difference between a freewheel and a cassette makes no difference in this article, so don’t worry about that.)
For this article, our example bicycle will be a modern mountain bike with three chainrings and an 8-speed cassette. Some people would call this a “24 speed,” but most avid cyclists and bike mechanics refer to this simply as an “8 speed.”
Discover How the Shifters and Derailleurs Work
Having gears won’t do you a bit of good without understanding how the shifting works, so here’s a look at that…
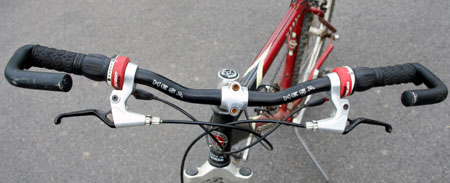
Shifting starts at the shift levers, which are usually located on the handlebar beside the grips. When you move one of the shift levers, a cable pulls or releases one of the derailleurs which moves the chain from one gear to another.
In typical setups, the left shifter is matched to the front derailleur (so it shifts between the chainrings.) The right shifter is matched to the rear derailleur (which shifts between the cogs on the cassette.)
Let’s talk about the shift levers (“shifters”) first…
Each shifter will have numbers on it to indicate which gear you are in (this is the gear indicator.) In this example, our left shifter shows numbers 1-3, while our right shifter shows 1-8.
The lower the number, the easier the gear is. So if both the gear indicators show “1” then you are in the easiest gear the bike offers. If the left shifter is at 3 and the right is at 8, then you are in the hardest gear on the bike.
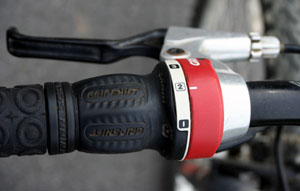
On the left shifter, you will see numbers to indicate which gear you are in – 1, 2, or 3. The number 1 corresponds to the little ring, 2 is the middle ring, and 3 is the big ring. For the front chainrings, bigger chainrings equal a harder gear.
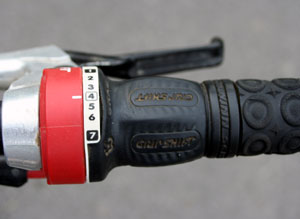
On the right shifter, the numbers 1-8 are all there. The number 1 corresponds to the biggest cog, while number 8 corresponds to the smallest cog. When it comes to the cassette, bigger cogs equal an easier gear.
Let’s not forget the derailleurs…
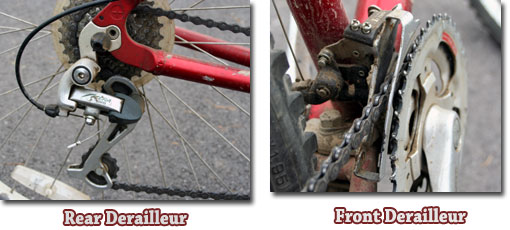
This is the easy part though, because once you shift the levers, the shifter cable will relay your instructions to the derailleur.
What happens when you shift is the derailleur cage (which the chain runs through) will move to either side. Let’s say you shifted the front shifter to an easier gear. The front derailleur will move to the left, thereby “derailing” the chain onto the smaller chainring. As long as the derailleurs are adjusted properly, they will do their job just like that, and you can concentrate on shifting!
Types of Shifters
Before moving on to shifting and gear selection, let’s take a quick look at the various types of shifters out there. (We’ll concentrate on the three types that are most common on modern bicycles.)
First, grip shift. With this type of shifting, there are no levers. You shift by twisting a section of the grip forward or backward, depending on whether you want a harder or easier gear. It is very simple to get the hang of it, so it comes on most mountain bikes in the $100-300 price range.
Note: Pictures in this article are grip shifters.
Second, trigger shifters. These are also very common on mountain bikes, but also on road bikes, in different form. (They are usually called Shimano RapidFire or Shimano STI.)
In this case, you’ll have two “triggers” beside each handlebar grip. There are two triggers on each shifter because the triggers only move in one direction.
On the left trigger shifter, the small trigger shifts to a smaller chainring, for an easier gear. The bigger shifter will shift up to a bigger chainring, for a harder gear.
On the right trigger shifter, the little trigger shifts to a smaller cog, which gives you a harder gear. The bigger shifter will shift up to a bigger cog, which gives you an easier gear.
(Trigger shifters do sound complicated, but they aren’t a problem once you practice with them a little bit.)
Basic Fundamentals of Gear Selection
Now you know the basics of shifters and derailleurs, so let’s move on to choosing which gears to use.
The most important thing here is that there is no such thing as the “right” gear. Choosing a gear depends on numerous factors, not the least of which is comfort. Really, gearing is personal preference, so you and your friends will probably ride in different gears, even if you are going the same speed on the same road.
However, one thing to consider is your cadence. Cadence is another word for your pedaling speed (basically, how fast your legs spin in circles.) This is measured in RPM, or “revolutions per minute.”
Cadence is important because it directly impacts your comfort level. Pedaling at a slow cadence usually means you are using too hard of a gear, and your leg muscles will tire out quickly. It can also hurt your knees. A good rule of thumb is to keep your cadence fairly high, usually in the range of 75-90 RPM. (Here is how to count your cadence.)
But aside from comfort and cadence, the middle of your gear range is a good starting point. Say you’re starting out on a flat road at an easy to moderate pace (on the “24 speed” bike.) You should be in your middle ring (2) up front, and roughly your fourth largest cog (4) in the rear.
(A good moderate gear is pictured to the left.)
To make small adjustments to your speed, you will want to shift the rear derailleur. If you need to go a little faster, shift to a smaller cog (5, 6, or 7.) If you want to ease up on the pace, shift to a bigger cog (1, 2, or 3.)
But if you come to a steep hill climb, or a long downhill, you will want to make a big jump in your gearing. So instead of shifting the rear derailleur, you’ll shift the front derailleur first.
An Example of Proper Shifting
Here is an example of how you might shift gears while out on a bike ride. At the start, you are currently in the middle ring and one of the middle cogs. Then…
Let’s say you’re coming up to a steep hill climb. You will shift to the small chainring (1) up front. If that gear isn’t easy enough, then you will shift the rear derailleur to a big cog (1, 2, or 3.)
Once you hit the top of the hill and the road flattens, you can go ahead and shift the rear derailleur back to a slightly smaller cog, getting to number 3 or 4. Then it’s time to shift the front derailleur back to the middle ring (2.) If the road remains flat, you could stay in that gear or shift the rear derailleur once again, going to 5 or even 6.
But then when you hit the downhill, you need a big change in gears, so you’ll shift the front derailleur up to the big ring (3.) That should give you a good gear. If you need a harder gear though, you can shift the rear derailleur to the smallest cogs, 7 and 8.
As the road changes, keep repeating the process.
Just remember: Shifting the left shifter makes a big impact, and shifting the right shifter is to fine tune your gear selection. You will shift the right shifter (for the rear derailleur) much more often than the left shifter.
What to Watch Out For
If you followed along through that gradual shifting process, you might have noticed we only ran through about 12 different gear combinations, when the bike actually offers 24. Why?
Well, your “24 speed” bike isn’t meant to use all the gears. Certain gear combinations are very rough and sometimes dangerous.
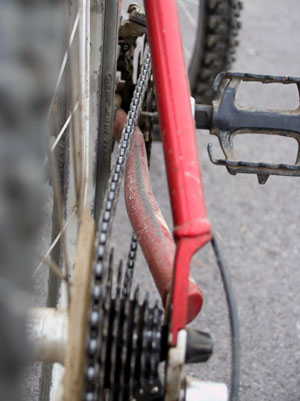
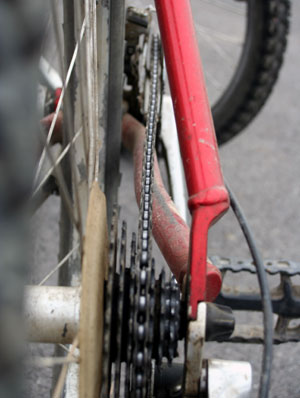
See, you need to keep your chain running in a straight line for the bike to ride smoothly. You do that by using certain combinations of gears and avoiding others. (A straight chain line is pictured in a previous section.)
For example, when you are in the small chainring, you will want to use the biggest four cogs, numbers 1-4. When you are in the middle chainring, you can use most of the cogs, but I would stick to numbers 1-6. When you are in the big chainring, you should stick with the smallest cogs, 6-8. This will keep your chain in a fairly straight line.
If you use extreme gear combinations, such as the small ring and the smallest cog or the big ring and the biggest cog, that’s called cross chaining. This puts the chain at too much of an angle, which makes the chain wear out extra fast. (You’ll usually hear some sort of grinding noise coming from the chain if you do this.) It also makes it more likely that the chain will fall off the bike.
When to Shift (A Few More Pointers)
To shift smoothly and easily and keep a constant, comfortable cadence, you want to anticipate your shifts. It’s just like the example above.
If you are approaching a steep hill climb, you want to shift down to an easier gear before you need to. The steeper the hill, the more gears you will want to shift down.
If you wait until you can barely turn the pedals before shifting down, you’ll have a heck of a painful time trying to climb the hill!
Likewise, if you are going downhill, gradually shift up as you gain more speed. Don’t wait until your legs are spinning around like crazy!
Another thing to anticipate is starting up after you come to a stop. If you are riding in a big gear, you will want to shift down as you slow down and come to a stop. If you stop while you’re still in a big gear, it will be very hard to get started again!
But if you anticipate that and shift to a low gear before stopping, you will be able to start easily.
Proper Shifting Technique
There is more to shifting than just twisting some levers. Shifting requires precise coordination between your hands and feet; the better you coordinate your movements, the smoother your shifts will be.
The basic principle here is that you have to be pedaling for the bike to shift. The chain needs to be moving forward for the derailleurs to do their job, so always pedal when shifting.
But there is a little trick to it. You need to be pedaling lightly and softly for the bike to shift smoothly. It’s called “soft pedaling.”
If you are pedaling too forcefully, your leg power will override the derailleurs and there will be no shifting, just grinding noises! (Think about it, your legs are big and muscular, and the derailleurs and chain are just little pieces of metal.)
So here’s how to shift:
As you move the shifter with your hand, simultaneously ease up on your pedaling for one stroke. You should hear and feel the shift complete smoothly. Then you can resume pedaling with full force. Don’t worry, you only ease up for a second, so you won’t lose speed just from soft pedaling.
That’s all there is to it. Most people I see that have trouble shifting simply need to try soft pedaling. It is a common misconception that you need to pedal hard and fast to get a shift to complete. Proper shifting actually calls for the opposite approach!
Just get out there and practice…
Getting Started (Practice Makes Perfect)
Now that you know what to do, it’s time to do it. But it won’t hurt to do a few practice runs first!
The first thing I would do is run through the gears by hand. Just prop the bike up so the rear wheel is off the ground (if you don’t have a repair stand, just hang the bike on a tree branch or something,) and then shift through the gears while pedaling with your other hand.
Once you see it in action, head out to an empty parking lot and ride in circles. You just want to get the “feel” for shifting so that it becomes second nature. You want to be able to go ride and pay attention to your surroundings, without needing to look down at the shifters.
Don’t feel bad if it takes a while, we’ve all been there at one point! It’s not easy to go from one speed to dealing with 24 or 27!
(Think of it like driving a manual transmission car – most people don’t know how to do that!)
Levi Bloom is an experienced endurance athlete who has been training and competing for over 17 years. A former Cat 1 road and mountain bike racer (professional class on the regional circuit), he is now a cycling coach (USA Cycling Level 3 Certified) and sports nutrition coach (Precision Nutrition Level 1 Certified).


what would an incorrect gear change cost in time?
@john
In most circumstances, switching to too high or low of a gear can easily be fixed by switching back, and you’ll lose a negligible amount of time.
However, say you’re coming up to a very steep dirt hill climb (when mountain biking.) If you’re in the wrong gear, or shift too late, you could end up falling over and rolling back down the hill, costing you a lot of time.
I can’t tell you how much I appreciate this article. My granddaughter and I love to bike together, and her bicycle is complicated (to us). She is only twelve, and my bike only has two speeds, so when hers started grinding I had no idea what was wrong. Your article explained it perfectly. Thank you so much for taking the time to do this.
@Margie
I’m glad it helped, that makes it well worth the effort to write it 🙂
Have fun out there!
just picked up an 8speed. havent rode a bicycle in over 30 years. thank you for helping me try to understand the madness of the shifting combos. i apperciate your efforts.
Very helpful – Now I am less of and idiot.
VERY much appreciate you writing this article. My last bike was an old 3-speed, just got a cheapie 18-speed and got really confused with the gears.
Thank you thank you!
This is helpful I have more of an idea now. I often have to rest probably due to fitness as well Im guessing.
Another grateful reader here… Just picked up a mid-80s Univega “12-speed” and as the gears have no marks or numbers I was unsure whether “down” meant “lower” gear, and how to coordinate the two… Your article is great at explaining the “how to” for dummies — Now I’d love to see a follow-up explaining the physics of why certain gear combos are easier or harder… BTW, I guess my bike is actually a 6-speed then? (Big front ring 4 rear smaller cogs, Small front ring 2 remaining rear cogs) THANKS!
Yet another grateful reader here ! Thanks for the article, it really has helped understand exactly how to handle gears. I bought for first 24 speed bike, the last bike I had was a BMX when I was 10 years old so at the grand age of 36 I’d lost track of how technology has moved on. I still find it shocking that large UK bike shop chain stores (they know who they are) sell 21/24 geared bikes but don’t actually spend any time just explaining to their customers how to use them, I can only presume this is so you have to use them to get them to repair them at a charge once you’ve managed to break the chains lol. Your article however has really helped plugged my knowledge gap so thanks very much for this.
I”m just confused… let’s say I”m in 6th spot on right shifter should I then be in the number 3 on the left for proper use and not ruining the chains? I just need to know what is correct…. low on right (1-3) use 1st on left…. (4-5) use 2nd gear on left…. (6-7) use gear 3 on left… is this right? Someone at the bike shop told me this is the correct gears for each side…. Please help….. Thank-you
First of all let me say thank you for this article. I’ve been so confused since I started biking a few months ago. This explains everything. I do have one follow-up question. How do you describe what gear you are in when you are talking? Do you say “2-6” or would you say “13th gear”? My girlfriend asked me while we were riding last week and I awkwardly said “Um…2 on the big on and 6 on the little one?” Needless to say I didn’t look very cool.
Thank you for your very helpful explanation. I just have a different bike I bought this evening. On the right I have numbers from 1 to 6 which explains how it works 1 for steep hills and the more I go up with numbers the more I gain speed. However, on the left handle I have something called friction and a plus and minus signs. What is this used for? Can anyone help?
@Clay
Say “2-6”
In situations like that, just pick one choice and act confident about it. She probably wouldn’t have second-guessed you 😉
@Mohamed
There are two types of shifters – friction and index. Indexed shifters mean there is a specific slot for each gear, and each twist of the shifter clicks it into a different gear. These ones are numbered like where you see the 1-6.
Friction shifters do not have specific slots for each gear. You push the lever to shift in either direction and stop whenever the chain in lined up over the chainring.
I would guess you have two chainrings up front. You follow the same principles mentioned in the article as far as which one to use, the only difference is the feel of the shifting when you move the lever. Just push the lever back and forth to shift while you’re riding and you’ll figure it out.
“Likewise, if you are going downhill, gradually shift up as you gain more speed. Don’t wait until your legs are spinning around like crazy!” Hahaha!that’s funny. It happened to me several times and its not a nice feeling to have while going down hill fast. It almost makes me feel I have very little control of the bike. I now shift to higher gears as I approach steep down hills. Cranking it is a lot of fun as supposed to coasting as well.
Great article and helps a lot. Thanks!
Thanks so much for this!! I just got a new road bike and had to figure out how to use the shifters!! This was great. Thanks again for the help!
I have a three speed Schwinn cruiser/road bike. When I stand to pedal it feels like the bike is shifting gears even though I have not manually shifted the gears. Any help? Thanks in advance.
I have an OLD Free Spirit. It is so old I can’t really remember when I bought it, but I haven’t rode it for at least 5 years. I want to get back to riding again but I can’t remember how to operate the gears. The bike says it is an 18 speed, but the numbers on the right only go from 1-6. Onthe left, there are NO numbers, just an L and an H. If I am trying to go up a hill should the controls be set on L and 1? Also, when I apply the front brakes it is 20 times worse than nails on a chalk board. My husband says the brakes can’t be oiled. Any suggestions?
Thank you
Thank you for the article, I thought I was the only one that didn’t know whatI was doing! In Seattle, the hills are treacherous and I have been afraid to ride, but I think I can manage now!
cool, i didn’t know that about the soft pedaling, interesting
Thanks. This was a very clear explanation. I haven’t gone for along bike ride since Jimmy Carter was in office! Bikes have changed quite a bit. I get my bike tomorrow and I’ll ride around until I get the “gear thing” working.
I just bought a 24-speed mountain bike online that came 90% assembled (including shifters/derailleurs). After completing the assembly, I discovered that the right (rear) shifter indicator appears to indicate the opposite of what it should (i.e., it is easier to pedal when it indicates I’m in 8th gear than it is in any of the lower gears.) What’s wrong with the bike setup that causes this?
Yes, thank you so much for taking the time to post this information. It is so helpful. I am currently looking for a bike and didn’t really know what was hype, what wasn’t, and what I would need.
This helps tremendously. THANKS!!!
Thanks, I really needed this information as I lost the booklet that came with the bike and couldn’t figure out what to do. Great explanation!! Thanks
A very high quality article, please continue to cover beginner concepts.
I have not been on a blike for twenty years and recently decided to get back to riding. Your article is VERY helpful.
I have one question: Do you have to pedal going downhill? Can’t you just leave the gears where they are (instead of shifting up) and just coast?
Thanks.
@Victor
No, you don’t have to pedal downhill. You can coast if you prefer.
Just make sure you’re ready to shift gears when you start pedaling again, because you’ll probably want to use a different gear than you used to get up the hill.
Thanks I found this very useful not only for myself but also it saved trying to explaing it to my cycling partner – we are both newbees
Rowal
Best explanation I found online. I just got a 9 speed road bike (double) and the bike shop fitted me and adjusted the bike etc BUT DIDNT TELL ME–A NEWBIE–HOW TO USE THE GEARS!
Thank you so much for this article. I have been looking all over the web for such a through but simple explaination of the gears. I was so confused!
Many thanks! This explained everything perfectly. Now I finally know what that grinding noise is … and why those pedestrians were walking faster than me uphill! 😉
Thank you. This was exactly the kind of help I needed. I appreciate the time and effort you put into this.
Thanks so much for this article. Shifting is intimidating for me and is an experimental adventure for my husband! We’re “seniors” picking up our new 21 speed cruisers today. Understanding how the gears work will make riding our bikes much more fun and easier now.
When changing NEXUS gears should I pedal forw ards,backwards or not pedal at all?
@A Norman
With the Nexus internally geared hub, it should shift fine while pedaling or stopped. It doesn’t require effort on your part like a derailleur system, which is what this article focused on.
I know the article was written a while back, but thank you, thank you, thank you.
I recently got a 24speed bike & couldnt figure out squat on it. This article really helped me to understand gears & shifting.
Well written & truly an article for beginners & pros alike.
Thanks.
I brought a used a moongoose xr200 26 sp, back wheel turns freely both ways front and back, whats wrong with it? thanks, mike
Thank you, thank you, and thank you. I haven’t been on a bike for 25years and have just been given a shine new fluid mountain bike with all these gears which I had no idea how to use. Your instructions are easy to understand and now I can ride with my little boy without feeling like an idiot!
Wishing you a great day!
Kel
After spending some time reading your article I firstly went and cleaned my bike!My husband then very helpfully lifted the rear wheel off the ground while I practiced changing gears. My problem has always been changing the front gears. I think that I’ve snatched at it in a sort of panic (!) resulting in grinding at best and the chain coming off at worst.This lack of confidence meant that I only ever stayed in the 2nd front gear and used the rear gears. Well, I have just returned home from a wonderful 4 hr solo ride where there was only an occasional little grind which I soon rectified and during which the chain didn’t come off once….EUREKA!!I feel so pleased.Understanding what is happening has made such a difference and given me the confidence to experiment. Thank you, thank you for sharing your knowledge and in such a way that people like me can understand the process.Safe riding everyone.
have a older ironhorse. love it but recently the cassette broke. replaced it now it clicks and jumps and clanks when i pedal, impossible to ride. what did i do wrong or what else might be wrong?
thanx for the help!
jackie
@jackie
Very common problem. You can’t mix new and old drivetrain parts. Your old chain won’t match up properly with the new cassette, so you’ll need a new chain. With the new chain, you may then need new chainrings.
Hi!
I am begineer, we friends bought 6 bikes yesterday of Hybrid -Helix Bergamont make. In morning i has ride & found difficulty. This artical give me so confidence that now Cycling will be cakewalk for me. I also shared this artical with my friends & they are so happy to read the same. Thanks a lot
Any document can’t be better than this one. I cant tell you how much impressed with this simple but great article. I am newbie biker and never used gear bike and bought a very nice diamond back bike for myself to keep fit and for outing.
As I never had gear bike so confused for 2-3 days about how to use gears and read so many articles and seen youtube videos. Some of them were incomplete or did not go well with my bike gears but I must admit this article is made for bike or ppl like me who are new to gear bike. I have got 3*8 gears so was confused much.
In end this nice knowledge sharing document wiped out my doubts and now I can even train someone in bike gearing stuff.
Keep the good work continue and Thanks a lot.
Vik
Thanks Levi. Great article. Reading slowly…to comprehend it all. I am a triathlete (6 time sprint) Most of my tris are on flat ground. I have a Cannondale EN14764. I have 3 speeds on the left, 7 on the right. Can’t seem to pick up speed beyond 13.5mph. Usually have it in 2 on the left 4on the right shifting for small hills. What am I doing wrong? Pushing hard, everyone flying by me! Frustrated!!
Sandy
Thanks a bunch Levi. I just got a “24 speed” Brodie bike and this article has definitely answered some of the questions about proper gearing. I’m gonna take my bike out and practice playing around with the different gears.
Thanks!! I just got a “21 speed” after YEARS of not having a bike, and I wanted to really make sure I was doing to avoid unnecessary wear on my new bike. I want it to last as long as possible. I’ve read several other articles about proper shifting, but this was the most concise and helpful, and the examples finally made it click for me. Thanks again!
I still dont understand what the marks on the left handle bar mean. It says H & L and each line gets thicker. What do I do with that? It seems like even after I lower my gear to 1 on a hill, it is extremely difficult to pedal. Do the marks have anything to do with it? Help!
@Sandy
The ones flying by you probably have expensive triathlon bikes and tough training schedules giving them the ability to ride in the big ring at high speeds!
This is definitely the best guide I’ve read for newbies. I’ve started to figure out the gears for flat and downhill (although slightly unnerved by some of the grating sounds as I experimented) but defeated on even the smallest hill despite being reasonably fit. Heading out on my lovely new Diamondback to seek out hills! Now thinking why did I wait so long to find out how much fun this is. Thanks for the article.
Oh wow!! thank you so much. The easiest and best explanation I’ve come across. Are keen to go out and give it a go. Previously – no wonder I did a lot of walking pushing the bike!!
Thank You, I just got a geared bi-cycle which I never used before and was really wondering how am I going to learn using gears, this guide was so user friendly explaining technically and functionally on the way of using the geared bi-cycle
This is the easiest informative tutorial for using these complicated bikes. I amd 35 yo and decided to start pedaling. After buying a 24gear bike, I got really frustrated as I didn’t know what and when to shift (though I knew how as I knew soft pedaling).
Now I knew. Thanks.
Thank you, thank you for this article. I was so confused after switching from a hybrid to a road bike with trigger shifters. I now feel confident to hit the road again.
Your article was exactly what I’ve been looking for! Haven’t ridden a bike in years and recently had the opportunity to “ressurect” an 18 year old 18 speed Murray bicycle. Got the front and rear derailleurs working However, in hanging the bike on a makeshift rack so that I could elevate the rear wheel for adjustment of the gears I can’t seem to get the adjustments right. The chain keeps coming back to the same gears instead of staying where they’re set. Do you have any articles as “follow-up” on the setting and adjustments of the derailleurs? many thanks
@Dan
Glad to help! Sounds like you might have an issue with the cable or maybe the shifter.
Try http://bikerepairvideos.com/
I found this info so useful that I saved it to my “favorites” for future reference. I’ve been riding a British Raleigh 3 speed for years and have grown tired of it and just purchased a Mongoose XCOM 7 speed. The 3 speed was just whooping my butt. The 7 speed looks like it’s just a matter of “clicking” the R handgrip to whichever gear you’re looking to switch to. Do any or some of the same principles apply as to the proper time to change gears?
Hi! Thanks for your help i have a hercules 18 speed rodeo, when i shift to my 5th gear it makes like a cranking sound as if the chain if falling and wants to jump off what should i do
Can you please tell me how to reassemble my gear assembly on the back tyre of my 18 speed mountain bike.I took it apart to fit new wheel bearings & don’t remember how to fit it back together.I am rather confused now & need your help.
It helped me a lot and can i do the same procedure in 21 spd bicycle ??
Thank you – you have no idea how much you’ve helped me here! I’m switching up from a 25 year old metal hybrid to a road bike from “this century,” and it’s like stepping out of a time machine. Now I’ll at least know about gears and shifting. You rock!
I have a 7 gear shift bike I got from a friend but it won’t go to 2 Or 1st gear the derailluer also popped off do I need to replace the derailluer or can I salvage it also do I need to replace the gear shift or can I salvage that or do I née to replace the bike all together please help thank you
@Jason Bourne and others
As much as I’d like to help, you really have to take your bike to a mechanic to see what’s up.
Or check a site like http://bikerepairvideos.com/ if you like to get hands-on.
Best till yet!!!
I am planing to buy a new Hercules Roadeo Stealth 21 Speed MTB.And will Leave my Old single speed Bike.
Thank You.
Sad. Despite what seems like a thorough explanation, I reached the end just as clueless about shifting as the last time I owned a bike (a 10 speed), back in 1990. 😛
Guess I’m destined to remain one of those sad sacks who can’t play with the Big Boys and will have to stick with a single-speed (and automatic transmissions for cars) bike and mostly walking uphill. 🙂
Oh, well. Good try. 😛 (and thanks for being one of those relatively few sites that allow for open commenting – modern life requires too many accounts!)
OK. I haven’t owned a bike since 2003. It was a hybrid that had 10 cogs IIRC. I haven’t shifted gears since then. I’m in the market for a Spec. Dolce Compact. This was very helpful. I wish somebody would do an animated version on how this works 😉
I give up…..no one will show or tell me HOW TO shift the gears. Yes, I know you pull the handle while in motion, but I just want a BASIC gear and I’ll leave it there. I just want to ride down to the store, I’m not training for a race or riding in the mountains. I think I’ll sell the bike and buy some new running shoes.
Thanks Levi! This has helped me decide if I should what type of bike to purchase since I haven’t owned a bike since I was ten years old! My son is seven and we just bought him a bike so now he’s ready to go bike riding however both my husband and I don’t have bikes so we are looking to purchase some bikes to go bike riding. Great article and great information.
Sincerely,
Thelma
Great Guide!!! Solved many doubts
Thanks for the effort Levi! Helps me a lot since I’m a freshman in the bicycle industry!
A lot of very detailed and clear advice. Now, … learn how to compute your gears into “gear-inches (G.I)”, then make a small chart with the G.I.s and tape it to your bike’s stem. Now you will be able to more intelligently select different gears based on how they compare to one or another.
As with many others on this site,I have not been on a bicycle in 25 years. Last night I told my 19 year old son, “I want to buy a bike tomorrow so I can get back in great shape.” This morning he drove me to the store and bought me a 7 speed bicycle. (sweetest youngman!) Foolishly, I thought “Once you learn to ride a bicycle you will never forget…” Your article brought it all back. THANK YOU! However, our neighborhood is all steep hills. I have muscular legs but, found myself walking up the hills halfway. Any suggestions on exercises for the muscles needed to climb steep hills? I do not want to let my son down. I have to be able to ride the neighborhood while he runs. 🙂
Just come in from a second ride on new bike. Needed to find out if my gear shifters were set up correctly as they seem to be set up opposite to the other. Your article explained clearly that the shifters are correct and I now realise how to change the gears correctly.
41 yr old bought a 21 speed hybrid.
Thanks
Loved the finely written article.
Learned a lot
Thanks
This helped me so much on my 4-h bike presentation. i have been in our bike club for 9 years, one of the biggest in the country. yes i understand all of this but it really helped to peice my presentation togethier.
Hi Levi, Your article was very informative regarding the technical aspect of how gears work. I was recently given a DiamondBack Serene Citi Classic 7 speed bicycle. It has Shimano 7 speed twist gears. As someone else mentioned in a comment, the right grip has numbers 1-7 but the left grip says friction or -. I tried looking at the manual for DiamondBack bikes but it is so general it doesn’t help. When I’m going uphill, I begin gearing down (I usually cruise in 5th or 6th gear)and the chain is on the middle cog wheel near the pedals. If I’m understanding correctly, as I gear down to go up the incline, the chain should move over to the smaller cog wheel near the pedals. But it never seems to leave the middle cog wheel near pedals no matter what I do. I’m not clear on the purpose of the and – on the left grip and didn’t really follow what you said to the other commenter. What is the left grip for? And, how do I get my bike to shift down. I can barely make it to the top of a steep hill w/out getting off and walking. My old Schwin 10 speed (from childhood) was too small for me hence the new bike but on that one I never had any problems shifting! Thanks for your help.
@Laura
Yes, the chain should indeed me moving over to the smaller front ring as you move the shifter on the left grip. If twisting that shifter doesn’t easily move the chain back and forth between all three front chainrings, it needs adjusted by a bike mechanic.
Thanks Levi–I’m taking my bicycle back to where it was purchased to have them look at it. The left shifter will move all the way to the and move to the large cog wheel by pedals but will not move all the way to the – and go to the small cog wheel. I thought I was just using the shifters incorrectly. Thanks to you, I know now there is something wrong with how the shifters are working.
What a brilliant explanation. Just bought a second hand Halfords Carrera hybrid bike. Loving going out on it but today the chain was rubbing on the deraillier at intermittent times. I was going to take it to the shop but from reading this it could be the cross chaining you described. I have read that you should progress through the gears every now and then to keep the bike running well. Pretty sure it may still need looking at as to get the chain on no 3 on the cogs by the pedals I have to go past 3 and release. I will be bookmarking this page to degest over and again until I “get it”. Many thanks
Lisa
@Lisa
Best of luck to you! Enjoy the ride!
Hi,
I just got a 21 speed bike (never had a bike with gears before) and I understand the theory behind it, but when i shift gears the bike sometimes takes a couple of pedal turns to properly click into place…. is that normal or am I damaging the bike??
@Neil
That’s normal for a used bike with worn components. A tune up may help speed up the shifting, though, which would also make it more enjoyable to ride.
Just awesome, you covered it all! 🙂
very good article…precise and very much to the point…thanks 🙂
thank you very much really helpful
Also have a Diamondback Serene Citi Comfort Cruiser 7-speed. Have been riding in the neighborhood on level ground and can’t seem to find the right gear combination for slow easy rides. Any suggestions?
I’ve just ordered a new 27 speed bike with triggers, a big change from my current 8-speed with grips. Thanks so much for this easy to understand write-up. It’s going to take me a while to get used to, but this has helped so much!
I recently bought montra rock 1.1 and I read your article about changing of gears for different locations. I found the article very helpful for the beginners to understand the mechanics behind the gears.
That was really useful.Thx a lot.
Thanks for the great tips and info on shifting gears.
I bought a Dahon Jack D24 last week and have used it twice already but couldn’t seem to get the shifting right. Last time I rode a bike was around 15 yrs. ago when using gears was much simpler.
Your article is truly the best I found on the net.
You are heaven sent =)
I have a 21 speed comfort bike, I never use the little gear or first gear on the front derailer, I never use the first seven gears. 1-1, 1-2. 1-3, ……..1-7. I use 2-2 until 3-7 skipping 2-6,2-7,3-1,3-2,3-3. I assume the gears on a 14 speed is 2-1 through 3-7 basically the only gears I use. Tell me if my understanding is right or not
Since I got nailed in a bad bicycle accident in ’92 I haven’t ridden a bike. I started wearing a helmet the week of the accident thanks to a friend, and if I hadn’t I wouldn’t be writing right now. I pogo sticked off the asphalt and my Bell helmet saved me. Bicycling has been growing and growing on me and a friend got me finally got me back into it recently. I’m not racing like you guys and ladies, but some day….anyway, I never really understood derailleurs and gear shifting like I should have. ONLY when I got to this site did I find EXACTLY what I needed and was looking for. GREAT site and multitudes of thanks! Some day I’ll upgrade from my Mongoose Ledge 21 bought at Wallmart but hey, for me it’s a great bike and I KNOW it will lead to something more advanced. My bike education can thank this site PRIMARILY. Thanks much!!
Hi. Thank you for this article. I have not ridden a bike since I was stationed in Japan back in 97-98 and that bike was pretty simple I don’t even remember what speed it was but it was basic. I wanted to start riding again to get in shape and was just so confused and a bit intimated about how to go about shifting gears I even called my sister who is an avid biker and she could not help me. She even admitted the gear shifting was still sometimes confusing to her. Thank you for taking away the my confusion. I was ready to return my bike and get a single speed just to avoid all the confusion the risk of ruining it because I didn’t have it in the proper gear.
My 10 year great nephew can tear up a steel anvil with a rubber hammer. He reciently recieved a new 15 speed bicycle. He has reciently tore up the new bicycle.
The problem:
The gears will shift, the pedal will rotate but the bike will not pull itself.
what will it require for repair?
Thanks Billy
Great blog ! Went thru so many blogs and youtube videos and all have been using very complex terms and little confusing. Glad reading your blog cleared my doubts and I am in right direction.
Note: Reading this blog after commuting to work on a bicycle and my legs were hurting and riding was not easy on my first day.
thanks
Yay! I finally understand this! Thank you, thank you!
I spent the weekend riding my new bicycle- a hybrid Ghost. It was terrific fun (it helped a great deal that there were very little hills- mostly gradual changes) but I honestly didn’t understand changing gear until reading your post. I’m 57 years old and THIS IS MY THIRD new bicycle in 8 years! I have an 8 year old Cannondale road bike as well, with less than 100 miles on it, and I broke the derailer two years ago. I’ve been afraid to ride it, the gear changing has been so intimidating to me, and I was so afraid I was going to break something else on it (including me- hip replacement shortly after the derailer replacement). My weekend riding and your article have inspired confidence in me, I think it is time to get the roadbike out again (I will confess, I also had my husband replace the clip pedals with regular once the bike was back from the derailer replacement- two bad falls in one 10 mile ride did it for me- at least until I get the rest of it figured out!).
Yes!
Thank You!) The manual to my Walmart bike left out explaining how the numbers on the shift handles corresponded to rings and cogs. Not having that understanding before riding, making the chain jump of the gears, and then trying to make adjustments caused me to really jack up that bike. Hopefully tomorrow with this basic knowledge you have enlightened me with, I can fix it and ride it well)
Thanks a lot for explaining the gears so well. It was easy to understand and now all that I have to do is to practice. Simple narration without too much of technical stuff to confuse ordinary minds.
Thanks..that was extremely useful and simple. I was trying some videos on youtube to understand this, but they were all quite complicated for a beginner. Now to practice..
I appreciate all the information given, this will make my bike ride easier, haven’t ridin since child, now 65yrs, friends surprise me with a 21d townie. Best article I,ve read thank you for your help, now I can go with them bicycle riding. Hope my knee can take it, the right one is painful, do you have any advice to easy on them while biking? Thank you again.
I don’t have #’s just H and L this doesn’t help me at all!! I’m so confused and my bike keeps clicking!!!! ??
Dear Levi, this article has been very helpful to me, and I am very grateful to you for writing it.
But I am almost more struck by the fact that you wrote it about 7 years ago and it has been getting pretty consistent thanks over that whole period.
You saw something that **really** needed doing, then absolutely nailed it. Kudos plus!
Thanks Blair!
Please tell your friends, there are lots of good articles here! 😉
Still a great article. I’m 27 and my partner and I just bought our first bicycles with gears. This article helped a lot.
One question, when the bike is stationary, is it okay to change gears? I noticed when experimenting that I can’t physically twist the gears into 1 front – 1 rear.
@Sean
Awesome! Glad to help!
OK, so when the bike is stationary, it is possible to change gears, but it’s an advanced maneuver that I wouldn’t suggest at first. It’s most useful for bike racers at the start line who need to get into a different gear but can’t move anywhere.
It requires moving the shifter to the new gear, squeezing the front brake, lifting the rear wheel off the ground by pushing the handlebar forward, and using one foot to turn the pedals so that the bike can complete the shift.
If all you do is move the shifter, the shift of the chain won’t happen until you try to ride away! And that is surprising at best; it could also cause a crash!
Thanks for the article. It helped me a lot.
Thanks for the Great article and easy explanation of how the shifters work! Despite what some folks think, it can be fairly confusing to most beginner riders. Keep up the good work!
Excelent and easy explanation, now I learn how to use my 7 speed, thanks.
Thanks for sharing I haven’t been on a bike in 30+ years and plan on going on a bike ride tomorrow:)
I just picked up a second hand 21 speed bike, I have not ridden in a number of years, and wanted to start just around our community. My question is related to the right hand grip shifter. I cannot get it to go below #4. Could the previous owner adjusted it so it would not go below? Is it necessary to go below #4? If so can I fix it myself??? (I don’t have many big hills here in Florida, just gradual ones that catch up to you!). Thank you!
Many thanks for this very clear explanation-I just need to remember it when I’m pedalling and put it into practice! Much appreciated
Thanks for an informative article. My rides are primarily flat here in Florida but it’s nice to have the information just in case. Little tips count, i.e., right=rear and to change those first to see if that is all you need. I am more confident now about how to use them.
Just wanted to say, I found this article so helpful. It’s given me a lot more confidence to get riding my new bike now. It’s so clearly written, and I like the way you’ve managed to explain the absolute basics without being patronising. Thank you!
Thank you so much for taking the time to write this up! I’m 31 and just started riding a bike again for the first time since I was 10 or so. I was feeling bad about not really understanding what gears to use–a child can do it, why can’t I? sort of feeling. This makes me feel a lot more confident!
I read your article on cycling and I have to disagree on one point – “comfortable” cycling and cadence. I started cycling again 3 weeks ago at age 65, a 55 year gap from my youth. My front gear has 3 sizes and the rear gear has 8 sizes. When I first started cycling again I used the middle front gear and the 2nd largest rear gear for a pedaling speed of 7 MPH with a cadence of 60. But I now use the front high gear and the 4th rear for the following reasons:
(1) My leg strength increased in just 3 weeks by cycling 2 to 3 times a day. I have only driven my Safari van 4 times in the last 3 weeks, I love cycling!
(2) Newton’s Law of Physics. Using the higher gear ratio I can go 12 MPH with a cadence of 60. Now here’s the key. I still only want to cycle at about 7 MPH so I drop my cadence rate down to about 40 and I can maintain my speed and have enough reserve strength in my legs that if I increase the cadence I can see a dramatic increase in speed, such as if I am approaching a hill and I want to build up my speed. Traveling at 7 MPH is not a muscular strain because “A body in motion wants to remain in motion”, or something like that. By a constant cycling action at about 40 cadence I am keeping the bike moving easily.
I find for city cycling this technique works far superior over the commonly suggested 60 cadence.
Another point of interest. Of the 24 gear combinations that I have there are 9 front to rear gear ratios that are within 5% of each other, so there are really 24 – 9 = 15 different speeds. The least common overlap of gear ratios occurs when the highest gear is used in the ratios. While using the front high gear I can see definite changes in speeds when changing the rear gears. Of course the actual speed obtained from the gear ratios can be manipulated by also changing your cadence. I find it a lot easier to change cadence than to change gears. In a pinch it is a lot easier to gear down on the front gear to middle gear and get an immediate increase in pedaling torque of 25%.
Cycling at a lower cadence assures you that you won’t slow down too much that you really have to pump hard for a short time to get your speed up back up and stop your from wobbling.
I am a reborn cyclist.
Danny
This is the best article on how to shift gears in bicycles. As a complete noob myself i can certainly say i know a lot more after just reading the article and it’s such well explained. Thanks a lot for taking the time to write.
Many, many thanks. I’ve scoured the net but all the ‘beginner’ guides obviously don’t know the meaning of the word 🙂
I’m 52 and after a gap of twenty years I decided to get off the sofa and buy a bike. I bought my 21 gear bike two days ago but was very apprehensive about riding it. I’m just about to set off!
You need a ‘Donate’ button.
When I go uphill, what gear should I be in for the front crank and what back cog should I be in? For the front crank should I be in 1 in the front and 1 in the back? I’m new to biking.
appreciated comment.keep it up….helped me a lot
Finally! A “How to” guide in Gear terminology and how to properly shift gears, in plain simple language.
Thanks so much Coach Levi!
Bless you!
Cheers,
Kenneth
Thank you for this easy explanation.
I have an Ironhorse 24-speed mountain bike for 3 years and I just replaced the whole drive train recently (chain, chainrings and cassette), and now I found out some of the ways I used to do for gear shifting on my bike was wrong after I found this article and read it all. It help me to get more understanding to do gear shifting correctly and how some of the gear combination need to be avoid, thank you.
As a bike newbie, I have a hard time understanding gear shifting and I found most articles online not very helpful. Thanks for breaking this down with clear language and lots of examples. I now have a much better grasp and I feel a lot more confident for the next bike ride.
Great article really helped me picking up my 27 speeed MTB tomorrow really excited now I know a bit more about gear changing Thank You!!!!
I got myself a new Cannondale mountain bike with 24speeds. I had no idea how they work and even the store salesman where I brought it wasn’t so smart to explain it right to me.
Thanks for explaining that we actually cannot ride in all 24 speeds eg 3-1.
Hi, I ride a powered bike with simple 6 gears all in one twist grip. I’ve just ordered a 27 gear non-powered bike as I’m fitter now and this article was very helpful. It should arrive on Thursday…can’t wait to get out on it! Thank you!
Coach Levi,
This is an outstanding article. I watched countless previous videos trying to figure out gear shifting and completely got rid of my confusion. Now I feel a lot more confident to gear shift on my Trek 390. Thanks!
Thank you for this article…. heading out for another ride today!
Almost a decade later this article is still really useful. Thanks for writing.
Levi, You are Amazing! Thank You so much for this article. I have ridden bikes all my life but was always confuzzled with gears. I have read thoroughly your article and then I wrote a one-page reminder with colored pencils, and a drawing of chainrings and cogs corresponding to left- and right- hand trigger shifters. Now i am off to a practicing season on my brand new shiny Electra Townie Commute 27 speeder that my (adult) children gifted me for a Mother’s Day!!! [I asked my daughter to explain me the gears and she said, “You just go by hunch”; my son said “Oh, it is so simple – just practice and you’ll figure it out!” – but i NEVER did!!! So, i went on google & found Your article. i am extremely happy now to learn about gears the proper (scientific) way! Thank You so much and have a great safe ride, Levi, and all of you co-travelers who read my comment, as well 🙂 Safe Road, Happy Trails!
Hello coach Levi
I have a question
So While coming downhill what should the left shifter be at 1 2 or 3 ?
Assuming the road to be slightly covered with traffic and in zero traffic?
Thankyou
@Tashi
Probably at 2 or 3; it depends how steep the road is. You’ll want to be in a gear high enough that the pedals don’t just spin around with no resistance. It’s easier to control the bike like that (if you feel some resistance), which is a good thing, no matter if there’s traffic or not.
Hi Coach Levi
Just fell off my bike, new rider at 51, I am trying to learn the gears and have just read your article which is brilliant, but I think I’m a bit dim or slow but can I just ask you – so on flat road I quite like gear left 2 and 5 or 6 right and then if going uphill should I change to left 1 and right 4(?) and then going downhill left 3 right (6?) sorry still bit confused I have a horrible feeling I’m causing chain to cross when I’m riding I read in your article that you have to keep chain straight. This is only my third outing riding to work 7.5 miles and I was just getting a bit quicker too, please reply if you can, thank you for all your help, Ruby
I love this article because of its conversational style and for how it’s jam-packed with helpful information. Thank you for your time and effort on behalf of beginners like myself.
Thank u so much for this article. I am new to gear cycle and it helped a lot
Thanks so much for this. Every other document or video only explains chains and whatever but I needed to know numbers! I am not looking down when I switch so it’s better to know which number I will use. I just started commuting to work so this is super helpful. Thanks so much!
This helped me a lot. My younger sibling yesterday bought “3 “7 geared cycle. Today I took for my workout but was using “3-7 for gaining speed and then after riding about 25 kms in total using many combinations I was not able to move from a place. Then I just started searching for a good manual and the first one i.e. yours helped me a lot. Thank you very much. I can’t express my anxiety now but I want to heartily Thank you. Keep it up Sir.
hi,
i have a 24 gear mountai bike and dont know what order to use them in properly. Can you please tell me what numbers go with which numbers on each gear trigger
(3 on one side)(8 on other side)
Reading this all the way from Dublin Ireland, have just bought a trek FX3 california blue 9 speed which I love. Have printed this off to have a good read the w/e. This article seriously has been the best I’ve seen on line, I’m a novice approaching 60 and like lots of people, handed over the hard earned cash and was given my bike and told have a good day ;( No explanation on gear shifting etc.
New to shifting, to the point that I want to ask that you are supposed to shift while peddling.
Have an old 5-speed with no gear indicators, and when changing,
feels like it’s in-between gears.
Is what I’m feeling normal, or just move the lever a hair to make
it feel solid?
@Ray
Yes indeed, be sure to pedal gently when you shift.
I bet your old 5-speed has friction shifters. With friction shifters, you do have to play around with the lever to get it into just the right position.
Hi Coach Levi. Great article, but can’t find the answer to this: my kids, aged 5 and 8, have just been bought 6 speed twist shift bikes by grandparents. They understand the reasons for gears, but what do they do when they brake to a stop in 6th and then need to pull away in low gear? I know they need to learn to change down when stopping, but kids are kids! Thanks in advance for your response, Keith. ps I am a non-cyclist, hence the dumb question.
I was just a curious 13 year old searching and trying to learn more about the new bike my mom got me never knowing the first website on Google could help this much. Thanks a lot my bike used to seem complicated but now it seems easy.
@Oluwatimilehin
So happy to help! Enjoy the ride!
I haven’t been on a bike in years but I just bought a nice comfort bike from a neighbor and am tryhing to learn to ride it. I didn’t understand how to use the gears at all and this is the best article I have found. Your explanations are logical and easy to follow. Thank you so much!
Great article, well explained with no overly-complicated jargon.
Thank you (a 50-something venturing out on a bike for the first time in a long time)
Great guides for beginners. I think I will share this with my team so that we can have good starting point. Thanks.
My Weight is 115 Kg and height 6.1 Feet.
Need your suggestion as to which bike will be good for me.
Travel – 10 to 15 Kms per day (May be around 0 Kms on weekend)
Budget – 30 K
Regards
I just went from a grip shift to a trigger shift on my bicycle, and your article was priceless while I try to “retrain my brain.” The bike looks a little funny, as I have hot pink dots on the shifters on both sides to remind me which lever to use to go into a higher gear . . .
AND I believe you explained why my chain has jumped off a few times (besides the fact that I pedal it into the dirt, that is) – as I got more powerful, I began to ride more often in the highest gear both sides. Sure enough, I heard grinding at times and felt “jumping” in the chain, had no idea why; and once I geared down for a stop afterward and then started again, the chain occasionally came off . . . twice in the middle of an intersection . . . not fun. Now I know better.
Thanks!
This was helpful. My mother-in-law gave me a very nice 12-speed in return for a large tricycle (a stroke cost her her balance.) It’s a super nice Schwinn with a cushy saddle and grip shifters, but going from a 3-speed to a 12-speed has been rough. Thanks for the instructions!
Though dated, this is a very well written article that explains things in a very simple and precise manner. Thank you. At 41, I’m just now getting into cycling and never thought there was more to it than just hopping on a multi-gear bicycle and riding (like back in my kid days). And having really just started out cycling, I am always researching, reading, and reviewing the basics, then going out and riding and putting into practice what I learn. Again, great article that is as relevant when it was written over 10 years ago as it is today.
I am aving a 24 gear bike…4+7. I generally use 2 on left and 1 to 7 on right as per gradient since living in city.Is it ok or too much cross chaning?
This article is so helpful. I’ve watched videos on YouTube, read loads of articles and it was all so confusing and none were really properly explaining how everything goes together, only partially providing details. I haven’t ridden a bike in a very long time and the bikes only had 1 or 3 gears. I thought it would be similar to a car in that you just progress up through the gears except with an additional 2 front cogs, so my thinking was you’d start at one and work to eight, then go to the middle cog and go from one to eight again, etc. It did confuse me because that meant a jump from eight to one to go up the front cog. My brand new bike was making a lot of horrible noises and I could see the chain hitting the disc. At a few points the chain cross-chaining and was on the wrong cog on the chainring i.e. on cog 3 when it was showing as on cog 2 and the chain even came off as I got close to home. So I came back home and read this article again and it all made perfect sense. I’m going out again today to try again, and I hope I’ll be a lot less confused. Thank you!
Hi Coach Levi, Great article. I was completely confused about gears and friction shifters but after reading your article it all made sense. Thanks you so much for taking the trouble in sharing your knowledge with us.
I wish I’d found your guide to bicycle gears years ago! Better late than never… ? I never understood how they worked and why, and only learnt through practice to leave my left shifter in peace on no. 2! Now I know the logic behind it and can stop wondering whether the gears are broken… LOL. Thank you for your article, it’s excellent, very clear and easy to follow. So glad I’ve googled ‘idiot’s guide to bike gears’ today.
Thank you, Coach Levi!!! So happy I can ride my bicycle with confidence now (have had it for about 9 years, ha). I watched quite a few YouTube videos before I found your fantastic article. It’s timeless info and I thank you for sharing your knowledge in such a thorough and easy-to-follow way.
Very interesting to learn the proper way of shifting.
when I accelerate or go uphill. I often hear loud cracking and delayed or imperfect shifting that can damage the chain, the belt, or even the chain ring. What can I do to not damage my bike?
Oldie but a goodie! Been some years since I rode a bicycle and never really understood “gears”.
You have helped an old man better understand the gears, thank you.
Your article about bicycle gears deserves my thanks because it simplifies complex mechanics into practical steps for riders. This guide provides straightforward and practical instructions which greatly reduce the fear of shifting gears for people moving from single-speed bicycles. The section about cross-chaining and proper shifting methods and cadence proved quite beneficial. You did a fantastic job making a difficult subject easy to understand!
Your knowledge contribution will definitely provide substantial assistance to many bicycle riders.