If you’ve ever trained with a heart rate monitor, or even just going by perceived exertion, you’re familiar with training at different intensity levels. And you’re probably familiar with how unreliable those metrics can be for both dictating future training and analyzing past performances.
But there’s a device that makes this much easier – practically fool proof. And it’s now accessible by most cyclists.
What is it? A power meter.
How do you use it? I’ll explain it right here! This article will serve as an introduction to training with a power meter (and you won’t need a degree in physics or computer science to make sense of it!)
Table of Contents
What Is Power?
Power probably sounds familiar. Everywhere you look, there’s power. It’s a simple concept.
In cycling terms, it’s the amount of work your body outputs during a ride. It’s what actually propels you forward.
Power is measured in watts (w). Think of it like a light bulb. There’s more output from a 100w light bulb than from a 60w bulb, just like if you produce 100 watts when riding, you’ll go faster than if you were to produce 60 watts in the same situation.
It’s the great equalizer when comparing training or results. There’s no faking it. You can’t increase power by getting excited or by installing aero bars!
How a Power Meter Works
Sort of like how a heart rate monitor goes against your chest (where your heart is), a power meter is located on the bike where it’s subject to your power output.
A sensor, or sensors, are placed in the drivetrain somewhere. It could be in the pedals, on one of (or both) the crank arms or chain rings, or inside the rear hub.
The sensor in this case is a strain gauge, and it measures the actual force you’re applying to the pedals. It combines that with data about your velocity (speed and movement), then transmits that data to a display unit on your handlebar, where you get a real-time power readout in watts.
The Principles of Power-Based Training
Training with power is going to follow most of the same guidelines as anything else, but with a different measurement.
Instead of creating training zones around Lactate Threshold Heart Rate (LTHR), you’re creating training levels based on Functional Threshold Power (FTP).
Advantages of Power-Based Training over Heart Rate
Time to move from biology to physics!
It’s not so much that power training offers so many new advantages, it’s that it removes all the drawbacks of heart rate training! With heart rate, you know how hard your heart had to work to handle the amount of work you did, but you don’t actually know how much work you did.
Power measures your actual output and is not influenced by external factors like weather, hydration, your mental or emotional state, etc.. And it’s not affected by riding into the wind, riding a heavier bike, that type of stuff. Perhaps best of all, power is shown in real time. There is no lag. Whatever amount of power you are producing at any given second, that’s what’s going to be shown.
So you can use it for recovery rides, long endurance rides, intense intervals, and even sprints.
You’ll know for sure you’re at the right intensity level the workout calls for. Watts don’t lie!
To a certain extent, you can use power output to help pace yourself during a time trial.
Power meters help your coach, too. See, a power meter nearly paints a picture of your ride. It gives your coach insight almost like they were there with you.
Training With Power
Getting started should be very familiar. You’re going to need to set up your own training levels.
The only difference is that, instead of heart rate zones, we’ll be using power levels. In this article I’ll be referencing those levels developed by Hunter Allen and Andy Coggan, who literally wrote the book on power based training.
First, you need to establish a baseline to understand where you currently stand. So let’s look at FTP.
Functional Threshold Power (FTP)
Functional Threshold Power (FTP) is an important benchmark, sort of like Lactate Threshold Heart Rate (LTHR.)
But rather than the heart rate you can sustain at threshold, it’s the power output you produce at threshold. It’s the power output in watts that you can sustain for one hour.
It’s determined with a field test.
The FTP Field Test
This test is very simple in principle but much more difficult in reality.
The simple option is, you could ride all out for an hour and then look your average power for the ride. But I gotta be realistic, riding full out for a whole freaking hour, by yourself, is not fun. It SUCKS!
If the LTHR test was only 30 minutes, can’t we cut this down a bit? Fortunately, yes, it’s possible to determine your FTP using a 20 minute test!
The 60 minute test would be more accurate in theory, assuming you could stay focused and pace yourself perfectly for that long. That’s easier said than done, though, which actually makes it more likely for you to get a realistic number from the 20 minute test.
Here’s how to do it:
1. Warm up thoroughly for 30-45 minutes.
2. Ride for 20 minutes as hard as you can.
That’s the test. Once you’re done, find your average power over that 20 minute ride, and take 95% of that.
Say your average power for the 20 minutes was 315 watts. Your FTP would be 315 watts x .95 = 299 watts.
The FTP Field Test: Advanced Version
To get the most accurate results, you should complete both a warm-up and an anaerobic capacity test before your FTP test.
Here is the detailed testing protocol:
1. Begin with a 20-minute warm-up, working up to a moderate effort.
2. Three 1-minute fast pedaling efforts (100rpm) with 1-minute rest between.
3. 3 minutes of easy riding (under 150 watts).
4. Anaerobic capacity testing: Do two 1-minute all-out efforts with 5 minutes rest between each. Start out of the saddle and accelerate hard up to speed, really pushing until you explode at the end of the minute.
5. Ride easy for 10 minutes (or until fully recovered).
6. FTP testing: Ride 20 minutes as hard as you can.
7. Cool down with 10-20 minutes easy pedaling.
Tips for successful FTP testing:
- Pace yourself so that you’re not fading in the final minutes of the test. It should be a steady effort.
- Find a course that’s relatively flat and free of interruption.
- Even better, find a steady, gradual climb (under 5% grade) that takes at least 20 minutes to finish. The steady climb helps you to maintain a constant output, because even the flattest courses tend to be somewhat “rolling,” and it’s difficult to keep your power up on the downhills.
- Do the anaerobic capacity testing beforehand. It’s meant to pre-fatigue your anaerobic system so that your average power at the end of your 20-minute test will be closer to your one-hour power.
Power-Based Training Levels Chart
Now that you know your FTP, here’s the chart you’ll use to set your training levels.
Note: The Target Power Range is calculated as % of avg watts from the 20 minute max test. So you can use the actual number from the test; you don’t have to take 95% of that and then do these calculations on top of that. (Just a way to save a little work.)
| Level | Name | Target Power Range | Description |
|---|---|---|---|
| 1 | Active Recovery | <55% | Easy spinning. |
| 2 | Endurance | 56-75% | “All day” pace, or classic long, steady distance (LSD) training. |
| 3 | Tempo | 76-90% | Typical intensity of fartlek workout, spirited group ride, or briskly moving paceline. |
| 4 | Lactate Threshold | 91-105% | Just below to just above TT effort. Continuous conversation difficult at best, due to depth/frequency of breathing. Typical 20-minute intervals. |
| 5 | VO2max | 106-120% | Typical intensity of longer (3-8 min) intervals intended to increase VO2max. |
| 6 | Anaerobic Capacity | >121% | Short (30 sec to 3 min), high-intensity intervals designed to increase anaerobic capacity. |
| 7 | Neuromuscular Power | N/A | Very short, very high-intensity efforts (e.g., jumps, standing starts, short sprints) that generally place greater stress on musculoskeletal rather than metabolic systems. |
Here’s an excellent online calculator to help you out:
http://www.cyclingpowerlab.com/MonodCriticalPower.aspx”>http://www.cyclingpowerlab.com/MonodCriticalPower.aspx
You can put your test results in there and it will calculate your zones.
How often to test
Your FTP is (or should be) a moving target, progressively increasing. That’s the point of your training!
Over time, you will do more testing, and then update your power ranges for the training levels. That’s how you progress and get better.
I suggest testing and updating your numbers every 6-8 weeks. Or every 4-6 weeks during your heavy training season when you’ll make quicker gains compared to periods like base training.
Racers should be testing every 4 weeks or gathering data during races. That’s good data to use to set new training levels!
Further reading: https://www.trainingpeaks.com/blog/power-training-levels/
Power to Weight Ratio (watts/kg)
No talk about power would be complete without mention of power-to-weight ratio. This is an important measure of fitness and the best way to compare yourself to other people.
Just take the watts you generate and divide by your weight in kilograms. (Typically you would use your FTP test results, but it can be based on the power output on any race course.)
Let’s use a somewhat realistic example and say I get down to my racing weight of 152lb, or 69kg (weight in lb / 2.2 = weight in kg) and I’m in really good shape, where my FTP is 300 watts.
300w/69kg = 4.35 w/kg
Above 4 is really good, but not pro level. (You generally have to get over 5 to match up with any pros.)
You can improve your power-to-weight ratio. Just like your FTP, it should go up over time. If you implement both proper training and a sound nutritional strategy, your power/weight ratio should increase!
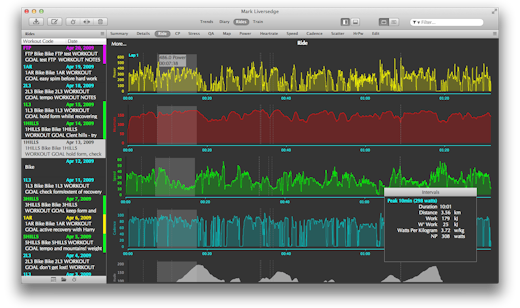
Monitoring and Analyzing Your Training
All the testing and number crunching is worth it when it’s time to analyze your training.
But there’s a learning curve here. Power is a complex topic, there is a ton of data, and analysis is done with high-tech software.
You can keep it simple, or dive deep into the data and make things super complex. Your choice.
Useful metrics
What does it all mean?!
Here is some of the important terminology:
Power
A snapshot of your work output at any given moment.
Average Power
Your average power output over the whole ride. (Same concept as average speed or average HR.)
Threshold Power
This is FTP, as described above: how much power you can produce steadily over a one-hour period of time.
Normalized Power (NP)
An estimate of the power you could have sustained for an entire ride if you’d been averaging a constant power output (and didn’t have stop signs, downhills, etc..) It’s generally a better fitness indicator than avg power.
Critical Power (CP)
Originally developed in the 60s, long before cyclists were using power meters, the proper scientific definition is “a power level that could be sustained for a very long time without fatigue.”
That’s not particularly useful to us, because a power level you could sustain for a very long time without fatigue is not going to result in a pace that will win you any races. So the Critical Power model has been adapted to us cyclists and taken on a bit of a different usage.
In the context of your training, it’s used more like “CP20” or “CP60” to mean your maximum sustainable power output for a 20 or 60 minute duration. FTP and CP60 are essentially the same thing
Training Stress Score (TSS)
A measure of the total workload of a ride, as a function of duration and intensity (how much of your threshold power you produced, and for how long.) This was developed by Andrew Coggan and fully integrated in TrainingPeaks. It’s a good way to compare rides to each other, to keep tabs on your overall work for the week, and for knowing when it’s time to recover.
There are many others, but those are most important to understand in the beginning.
Computer Software and Online Tools
There are a few good options to choose from for keeping track of rides and analyzing performances.
Training Peaks Premium
There is a Training Peaks Basic edition, which is free, but the web-based subscription model is a very popular option. It’s great for planning your training and performing basic analysis. It’s best suited for a cyclist with a coach, because it makes sharing data seamless.
$19.95 monthly or $119.00 annually, TrainingPeaks.com
WKO+ Software
Similar to TrainingPeaks (it was developed by the same people,) WKO+ is software you run on your own computer. It offers a different feature set which allows for much deeper analysis.
$129.00, TrainingPeaks.com
Cycling Analytics
This is a less popular option that hasn’t really caught on, but it’s a solid choice that’s available as a web-based application. Check out the 30 day free trial.
$10/month or $80/year, CyclingAnalytics.com
Golden Cheetah
The Golden Cheetah software is really good, really popular, and very similar in features to TrainingPeaks/WKO+. Best of all, it’s free! I’d recommended downloading a copy.
Strava Premium
Strava is great for so many reasons, and they even offer power analysis now for Premium members. I wouldn’t classify it in the same category as the rest of these programs above; it’s best if you want something simple and intuitive.
$6 per month or $59 per year, Strava.com
Power-Based Training Plans
So, you need to create a training plan?
Let me suggest one of the many goal-specific training plans found here on CoachLevi.com.
Power Meters
Yes, they are still expensive, but thanks to some big device makers getting involved, we’re seeing much lower cost options compared to just a few years ago.
Not long ago you had to spend $400 for devices that guessed your power. Now there’s a legit power meter for $400, with a few around $700, and a few more at $1200.
Types of Power Meters and Price Ranges
Power meters come in multiple designs, classified by where they are mounted. The four most popular mounting locations are:
- Rear Hub
- Crank Arm
- Chain Ring/Spider
- Pedals
Each type has its pros and cons when it comes to price, versatility, and complexity.
Top Brands and Examples
Here are just a few real quick examples of your power meter options.
PowerTap
The PowerTop is a popular option. It comes as a rear hub, so it’s easy to switch between bikes (just swap the rear wheel,) but it’s a pain in the butt if you use different wheelsets. Starts around $700.
SRM
The SRM is the gold standard when it comes to power meters. All the pros use it. It is built into the crankset/chainrings. Starts around $2300.
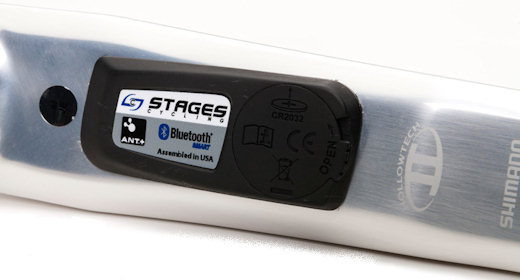
Stages Cycling
This is one of the newer, lower priced options. (I can’t lie, it has me excited!) It mounts on one or both crank arms. Starts at only $400.
Garmin
The Garmin Vector Powermeter Pedals are an interesting system. Everything is contained inside the pedal, making it easy to set up and swap between bikes. Starts at $900.
Do you need a head unit?
Typically the base price of a power meter is for the device itself, with no display unit.
That means you need some type of head unit. Fortunately, most use the ANT+ wireless data transmission protocol, so they can connect to your Garmin Edge head unit (or something similar.)
But if you don’t have something like a Garmin Edge 500 or 510 already, factor that into your budget.
Can’t get enough about training and racing with a power meter?

Then this is the book for you!
Training and Racing with a Power Meter, 2nd Ed.
This was written by Hunter Allen and Andy Coggan, the forefathers of power-based training. It covers all sorts of good stuff that I can’t even begin to describe.
From using a power meter during training to analyzing your data and crafting your own power-based training plan, it’s all covered.
It’s only $13.99 on Kindle. That’s a small price to pay compared to a power meter, and the book is legit – you’ll learn a lot!
I think it’s safe to say that power meters are very useful, and it’s not a stretch to say that power is the best way to train.
Unfortunately for running and swimming, you have to stick with heart rate, RPE, and pace, but for cyclists, there is no downside.
A power meter is not free speed like you’d get with a set of aero wheels, but over time, it earns you more speed if you put the work in. If you don’t already train hard, you’re just spending lots of money on a device that tells you you’re not working very hard. (And your riding buddies probably tell you that already!)
But if you’re a hard worker with big goals, a power meter will help you achieve them!
Show References
Levi Bloom is an experienced endurance athlete who has been training and competing for over 17 years. A former Cat 1 road and mountain bike racer (professional class on the regional circuit), he is now a cycling coach (USA Cycling Level 3 Certified) and sports nutrition coach (Precision Nutrition Level 1 Certified).


Leave a Reply